Nothing ruins a summer drive faster than an AC system blowing warm air. According to industry repair data, paying a shop to fix a blown line easily costs over $300, whereas repairing leaking automotive refrigerant hoses yourself runs about $40. Since these systems hold highly pressurized gas, standard worm-gear clamps simply cannot hold the seal.
That is why an AC hose crimper proves so valuable. In practice, this tool applies a permanent "360-degree squeeze" around a ferrule—the outer metal sleeve on the hose. This uniform pressure guarantees the crimp integrity1 required to safely lock the rubber and metal together. An AC hose crimping tool puts professional-grade repairs right in your own garage.
Manual vs. Hydraulic Crimpers: Choosing the Best Tool for Your Garage Space and Muscle Power
Deciding between a manual and a hydraulic AC hose crimper2 comes down to your budget and your biceps. You already know how a wrench uses leverage to turn a stubborn bolt. Manual compression tools use that same mechanical force, requiring you to crank a heavy screw by hand. Conversely, a handheld hydraulic press uses fluid power—just like a standard car jack—to do the heavy lifting for you. Pumping the handle forces fluid into a tight cylinder, delivering a uniform squeeze with almost zero physical strain.
- Manual Crimpers: Lowest cost (under $100), high physical effort, best suited as bench-mounted tools.
- Hydraulic Crimpers: DIY sweet spot ($150–$250), minimal physical effort, highly portable for tight spaces.
Where you plan to work often dictates your final choice. A portable Mastercool Hydra-Krimp alternative is perfect for repairing lines directly under a cramped hood without removing the entire hose. While manual tools work wonderfully when bolted directly to a solid workbench, spending a bit more on a hydraulic model offers unbeatable convenience and precision for most home mechanics.
Securing a permanent connection requires matching the correct plumbing components and understanding the anatomy of your hose assembly.
Hose Anatomy 101: Identifying Beadlock Fittings and Barrier Hoses for a Leak-Free Seal
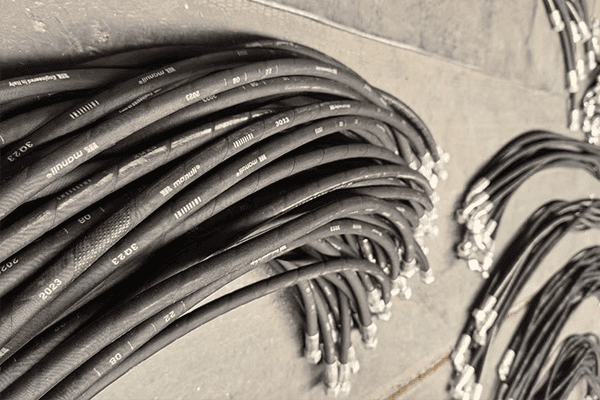
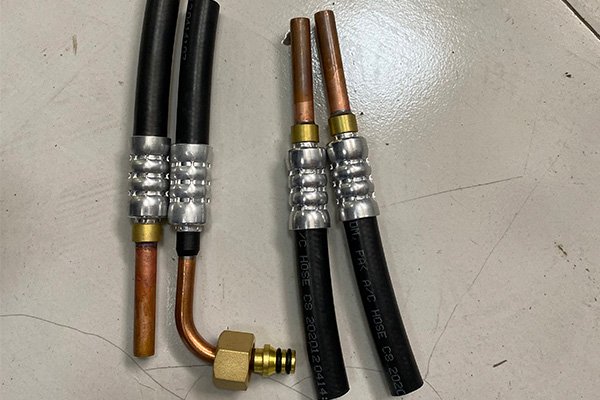
Before crushing metal, you must identify your plumbing parts. An AC line contains a rubber hose, an aluminum pipe fitting, and a metal collar called a ferrule3. Modern systems use beadlock fittings, easily recognized by a physical metal "hump" on the pipe that traps the rubber.
Ensuring perfect beadlock fitting compatibility means choosing the correct aluminum ferrule3 for your specific hose thickness. Most DIYers encounter two variations:
- Standard barrier hose
- Reduced barrier hose (thinner walls, requires tighter crimper teeth)
Match your repair to these common industry sizes:
- #6: Liquid lines (condenser to evaporator)
- #8: Discharge lines (compressor to condenser)
- #10: Suction lines (evaporator to compressor)
- #12: Heavy-duty suction lines
Knowing these specific categories determines exactly what size dies for standard AC hoses you need to snap into your tool. Selecting the right interchangeable teeth prevents you from accidentally crushing the pipe or leaving a loose, leaky joint.
The 5-Step Professional Crimp: From Sizing Your Dies to Achieving that Factory-Finish Squeeze
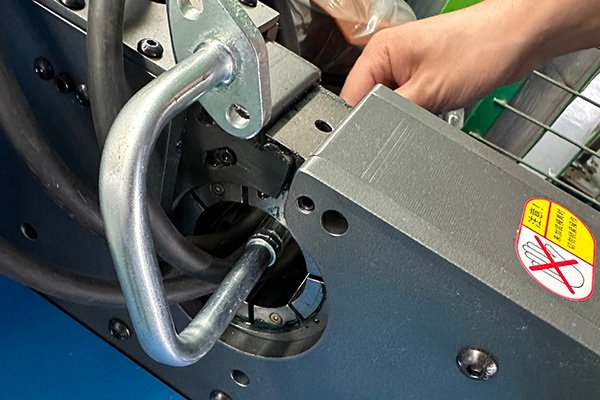
Armed with the right hose sizes, it is time to put your AC line crimping tool4 to work. Start by snapping the matching color-coded die set—the tool's interchangeable teeth—into the yoke. Mismatched dies will either crush the fragile aluminum or leave a dangerous, loose gap.
A reliable custom AC line fabrication guide always emphasizes preparation over brute force. Follow these steps to crimp air conditioning lines securely:
- Push the hose fully into the metal collar (ferrule3).
- Mark across both pieces with a Sharpie so you can instantly spot if the hose slips backward.
- "Clock" the fitting by rotating the metal tip to match its final mounting angle in the car, preventing twisted rubber.
- Center the assembly securely inside the jaws for perfect die alignment.
- Lock the retaining pin safely in place.
Pumping your manual or hydraulic air conditioning hose crimping tool feels exactly like using a standard car jack. As you squeeze the handle, fluid pressure forces those steel teeth closed in a powerful compression stroke. This creates a permanent 360-degree squeeze, smoothly molding the metal sleeve around the rubber hose.
Once the tool opens, you are left with a clean, factory-finish connection ready to handle hundreds of pounds of refrigerant pressure. However, before bolting that shiny new part onto your vehicle, you must verify the tool did its job correctly.
Spotting a 'Bad' Crimp Before It Leaks: Visual Inspection Tips and Pressure Testing Basics
Attaching high pressure refrigerant fittings successfully leaves a distinct visual signature: a uniform, evenly spaced hexagonal dimple pattern around the metal collar.
When identifying failed crimp connections, look closely for:
These are classic signs of over-crimping, meaning the tool crushed the metal rather than molding it. Give the hose a firm tug; if it shifts, it will never survive automotive HVAC system pressure requirements.
Even perfect-looking joints need confirmation before charging. Performing a basic vacuum decay test5—sucking the system into a vacuum and watching if the gauge needle creeps back toward zero—proves the seal's hidden integrity. Catching microscopic leaks now prevents you from venting costly R134a or R1234yf refrigerant into the atmosphere.
Your Leak-Proof Action Plan: Selecting Your First Crimper and Starting Your Custom AC Project
You no longer must rely on expensive shops for custom engine swaps or vintage restorations.
Your path forward is simple:
- Identify the leak
- Choose the correct fittings
- Match die sizes to your hose
- Select a manual or hydraulic AC crimper based on your workload
That air conditioning hose crimper is your key to leak-proof, factory-quality seals.
Lock in your margin. Control your repair cost. Deliver professional results—directly from your own workshop.
-
Learn visual inspection tips and vacuum decay testing to catch bad crimps before they leak. ↩
-
Discover top-rated AC hose crimpers that deliver professional-grade seals without the shop price tag. ↩
-
Understand how the right ferrule size ensures a permanent, pressurized seal on your AC lines. ↩ ↩ ↩ ↩
-
Follow a pro-level step-by-step guide to achieve a perfect 360-degree crimp every time. ↩
-
Master this simple test to confirm your crimp is airtight before charging expensive refrigerant. ↩